Baseboard moulding—often simply called “baseboards” or “skirting board” in some regions—is one of the most fundamental yet transformative elements in interior design and construction.
This horizontal trim piece installed along the bottom of interior walls serves both practical and aesthetic purposes, creating the visual foundation of a room while performing crucial protective functions.
From historic Victorian homes to sleek modern lofts, the style, size, and presence of baseboard moulding significantly influence a space’s character.
Defining Baseboard Moulding
What is Baseboard Moulding?
Baseboard moulding is a type of interior trim installed horizontally along the junction between the wall surface and the floor.
It typically consists of one or multiple pieces that create a finished transition while covering the expansion gap left for flooring materials.
Basic Anatomy of a Baseboard System:
- Baseboard (or “base”): The main vertical board against the wall
- Base Cap (optional): A decorative moulding installed on top of the baseboard
- Base Shoe (or “shoe moulding”): A small quarter-round or angled trim installed at the bottom where the baseboard meets the floor
- Plinth Block (optional): A decorative block used at doorways or corners for transition
Why “Baseboard”?
The term combines “base” (referring to its position at the base of the wall) and “board” (describing its flat, board-like structure). In some countries like the UK, Australia, and New Zealand, it’s commonly called “skirting board,” emphasizing its protective role against “skirts” or furniture.
Historical Evolution of Baseboard Moulding
Early Origins (Pre-18th Century)
- Originally served purely practical purposes: covering gaps, preventing drafts, and protecting walls from moisture
- Early American homes often used simple, unadorned planks (typically 3-4 inches tall)
- Georgian architecture introduced more decorative profiles
Victorian Era (1837-1901)
- Baseboards became taller and more ornate
- Heights increased to 8-12 inches in formal rooms
- Intricate patterns, multiple-piece assemblies with base caps and plinth blocks
- Reflection of industrialization allowing detailed millwork
Arts & Crafts/Craftsman Era (Early 1900s)
- Return to simpler, squarer profiles
- Emphasis on natural materials and honest joinery
- Typically 5-7 inches tall with minimal ornamentation
Mid-Century Modern (1950s-1970s)
- Extremely short (2-3 inch) baseboards or complete absence
- Emphasis on clean lines and seamless transitions
- Often used quarter-round alone as minimalist approach
Contemporary Trends (1980s-Present)
- Return to taller baseboards (5-8 inches standard)
- Combination of traditional profiles with modern simplicity
- Increased use of MDF and synthetic materials alongside traditional wood
Primary Functions and Purposes
1. Protective Functions
- Wall Protection: Shields drywall or plaster from vacuum cleaners, mops, furniture legs, and foot traffic
- Moisture Barrier: In bathrooms and kitchens, protects walls from mop water and splashes
- Expansion Gap Cover: Covers the essential gap left between flooring and walls for expansion/contraction
- Impact Resistance: Takes damage that would otherwise affect wall surfaces
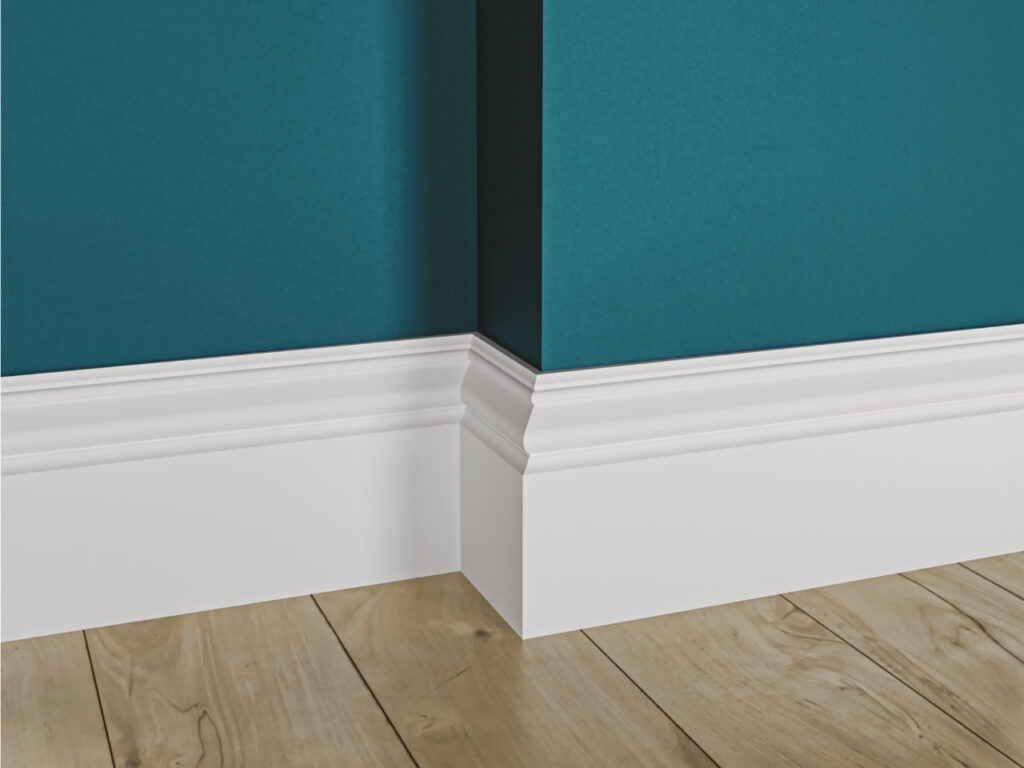
2. Aesthetic Functions
- Visual Transition: Creates intentional separation between wall and floor planes
- Room Definition: Establishes visual boundaries and “grounds” the space
- Style Expression: Communicates architectural style through profile and proportion
- Proportional Balance: Tall baseboards can make ceilings appear higher
- Color Transition: Provides visual break between wall and floor colors
3. Practical Construction Functions
- Imperfection Concealment: Hides uneven cuts where flooring meets walls
- Wiring/Cable Routing: Can conceal low-voltage wiring in some installations
- Plane Transition: Smooths the transition between often uneven surfaces
- Installation Reference: Provides straight line for flooring installers to work toward
Common Baseboard Materials

1. Solid Wood
- Types: Pine, oak, maple, poplar, cherry, mahogany
- Pros: Can be stained, durable, repairable, traditional appeal
- Cons: Expensive, susceptible to moisture damage, may warp
- Best For: High-end installations, stain-grade applications, historic restoration
2. Medium-Density Fiberboard (MDF)
- Description: Engineered wood product from wood fibers and resin
- Pros: Inexpensive, perfectly smooth, no grain, paints beautifully, stable
- Cons: Vulnerable to moisture, dulls tools quickly, cannot be stained
- Best For: Painted applications, budget projects, modern smooth finishes
3. PVC/Polystyrene
- Description: Synthetic plastic-based moulding
- Pros: Waterproof, flexible, pre-primed, insect-proof, maintenance-free
- Cons: Can look artificial, limited profiles, may not accept paint well
- Best For: Bathrooms, basements, high-moisture areas
4. Finger-Jointed Pine
- Description: Short pine pieces joined with interlocking fingers and adhesive
- Pros: More stable than solid wood, less expensive, paints well
- Cons: Visible joints, cannot be stained, may separate at joints
- Best For: Painted applications where stability is important
5. Composite Materials
- Description: Blend of wood fibers and polymers
- Pros: Moisture resistant, paintable, stable, environmentally friendly options
- Cons: Higher cost, limited availability
- Best For: Green building projects, high-performance applications
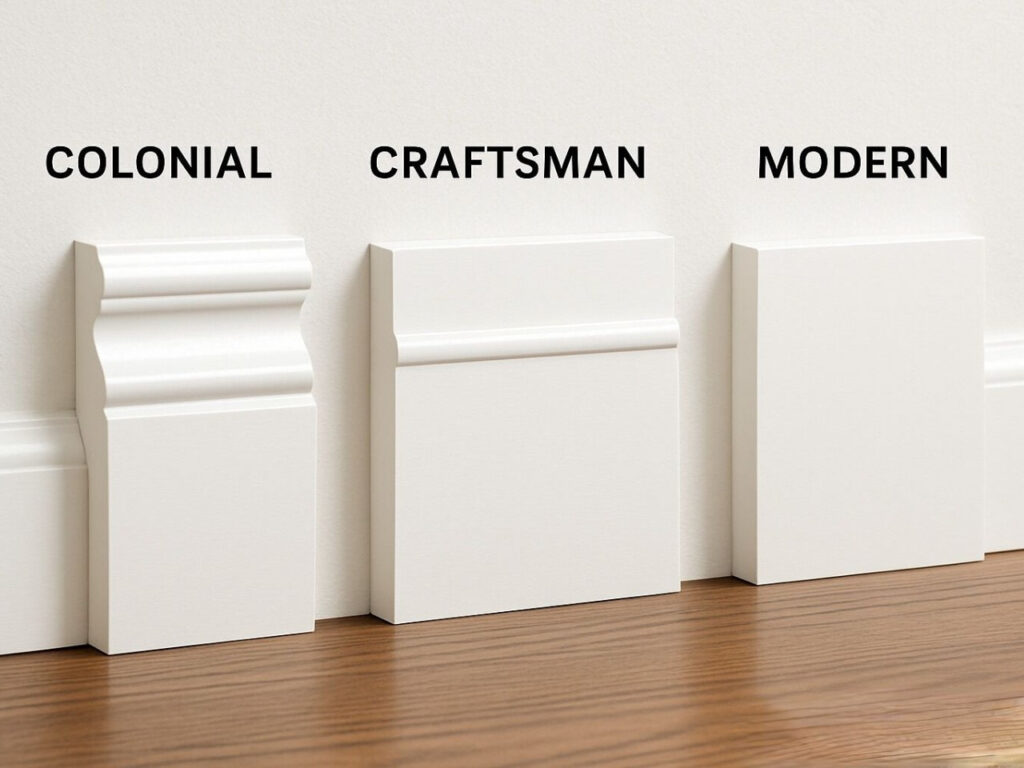
Baseboard Profiles and Styles
Basic Profile Categories:
- Colonial/Flat Base
- Simple, flat board with possibly a slight bevel or roundover edge
- Heights: 3-5 inches
- Era: Colonial, Early American, Modern Farmhouse
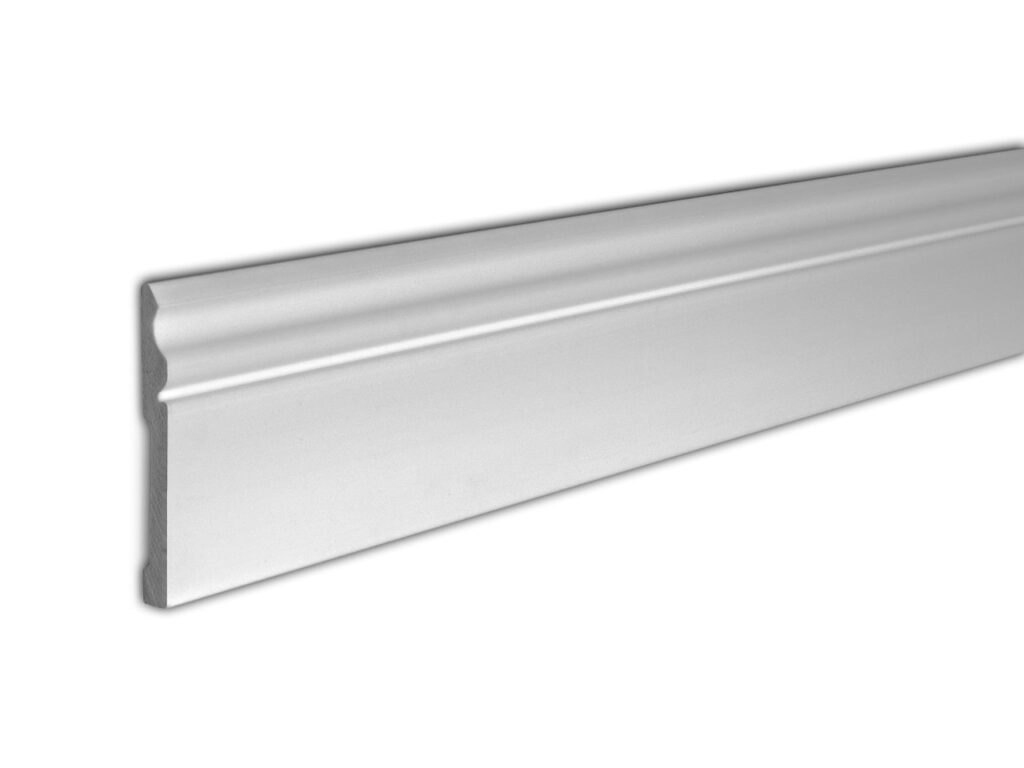
- Ogee or Colonial Coved
- Features an S-shaped curve (ogee) or concave curve (cove)
- Heights: 4-6 inches
- Era: Georgian, Federal, Traditional
- Clamshell or Quarter-Round
- Rounded profile resembling a clamshell cross-section
- Heights: 2.5-4.5 inches
- Era: Various, especially Mid-Century Modern
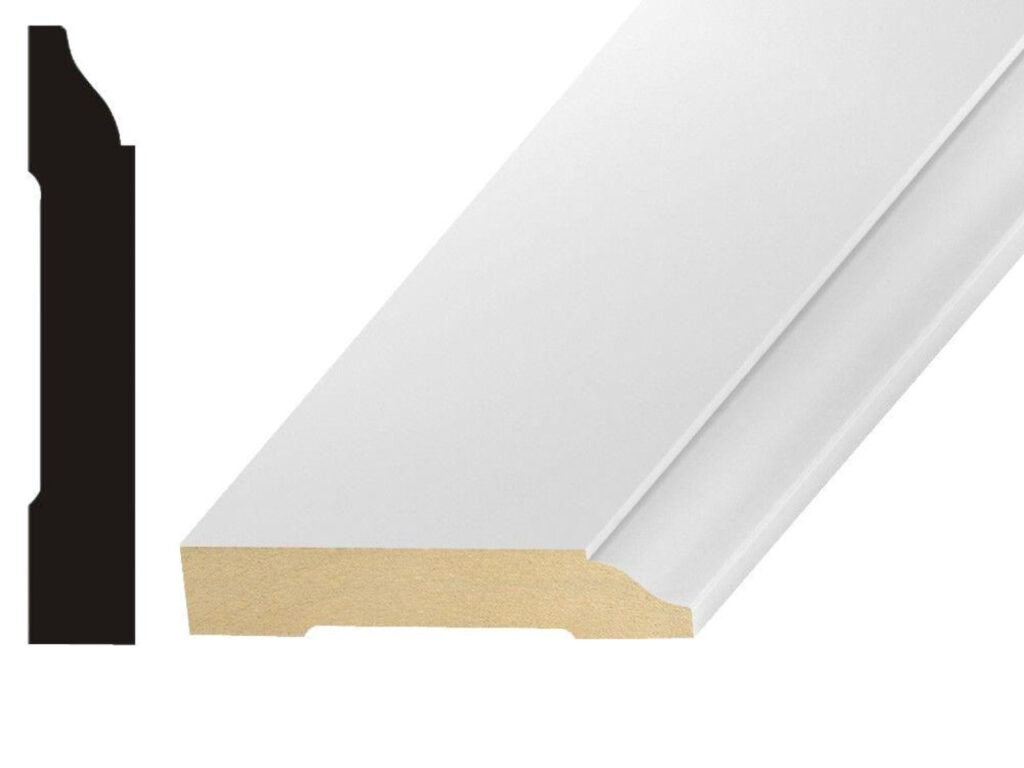
- Ranch Style
- Simple profile with one decorative routered groove
- Heights: 3.25-4.25 inches
- Era: 1950s-1970s Ranch Homes
- Sculpted or Ornate
- Multiple decorative curves, grooves, and details
- Heights: 5-12+ inches
- Era: Victorian, Traditional, Formal Interiors
- Stepped or Multiple-Piece
- Combination of baseboard plus separate base cap
- Creates layered, substantial appearance
- Heights: 6-12+ inches
- Era: Traditional, Craftsman, Custom Homes
Height Considerations by Room Type:
- Standard modern home: 3.25-5.25 inches
- Formal living/dining rooms: 5.5-8 inches
- Victorian/historic restoration: 8-12+ inches
- Modern/contemporary: 2.5-4 inches or none
- Commercial spaces: 4-6 inches (often rubber or vinyl)
Baseboard Moulding vs. Similar Trim Elements
Baseboard vs. Base Shoe (Shoe Moulding)
- Baseboard: Main vertical trim against wall; structural and aesthetic
- Base Shoe: Small trim at bottom; primarily covers floor gap; nailed to baseboard, not floor
Baseboard vs. Chair Rail
- Baseboard: At floor level; protects from floor-level damage
- Chair Rail: Typically 32-36 inches high; protects walls from chair backs; decorative divider
Baseboard vs. Wainscoting
- Baseboard: Single element at bottom
- Wainscoting: Complete wall treatment covering lower third of wall; includes baseboard, panels, and cap rail
Baseboard vs. Casings
- Baseboard: Horizontal along floor
- Casings: Vertical trim around doors/windows; often coordinate with baseboard profile
Baseboard vs. Crown Moulding
- Baseboard: “Grounds” room at floor level
- Crown Moulding: “Finishes” room at ceiling/wall junction
Professional Installation Guide
Tools Required:
- Miter saw (compound preferred for angled cuts)
- Tape measure and pencil
- Level (laser level helpful for long runs)
- Coping saw (for inside corners)
- Pneumatic finish nailer (15 or 16 gauge) with compressor
- Hammer and nail set (alternative to nailer)
- Caulk gun and high-quality paintable caulk
- Wood filler and putty knife
- Sandpaper and sanding block
Step-by-Step Installation Process:
1. Preparation Phase
- Remove old baseboards carefully using pry bar
- Repair wall damage from removal
- Mark stud locations (for nailing reference)
- Allow flooring to acclimate if new installation
- Paint or stain baseboards before installation (easier)
2. Measurement and Cutting
- Measure each wall section carefully
- Cut outside corners at 45-degree angles (test fit)
- For inside corners, use either:
- Coping method (professional standard): Cut one piece square, second piece coped
- Miter method (easier): Both pieces cut at 45 degrees (may open over time)
3. Installation
- Start with longest uninterrupted wall section
- Apply construction adhesive to back for additional holding power
- Nail into wall studs (every 16 inches typically)
- Use two nails at each stud location (top and bottom)
- For plaster/lath walls, use special anchors or longer nails
- Leave ⅛-inch gap at ends for expansion
4. Finishing
- Set all nail heads below surface
- Fill nail holes with matching wood filler
- Caulk top edge where baseboard meets wall (essential for clean look)
- Caulk inside corner joints if not perfectly tight
- Touch up paint or stain as needed
Critical Installation Tips:
- Never nail base shoe to the floor—only to the baseboard (allows floor expansion)
- Coping is superior to mitering for inside corners—won’t open with seasonal movement
- Install after flooring but before door casings for proper sequencing
- Use backer rod behind baseboards on exterior walls for additional insulation
- Check for level but follow floor contour with base shoe, not baseboard
Design Considerations and Selection Guide
Choosing the Right Baseboard: Factors to Consider
1. Architectural Style of Home
- Traditional/Victorian: Tall, ornate, multiple-piece assemblies
- Craftsman/Bungalow: Medium height (5-7″), simple squared profiles with possible cap
- Mid-Century Modern: Short (3″ or less) or absent
- Contemporary: Clean lines, minimal detail, often 4-5″
- Farmhouse: Simple 3-5″ colonial or flat stock
2. Ceiling Height
- 8-foot ceilings: 3-5 inches maximum
- 9-foot ceilings: 4-6 inches
- 10-foot+ ceilings: 5-8+ inches
- Rule of thumb: Baseboard height should be approximately 1/18 to 1/12 of ceiling height
3. Room Proportion and Scale
- Larger rooms can handle taller baseboards
- Small rooms may feel cramped with tall baseboards
- Consider furniture scale—large furniture needs substantial baseboards
4. Color and Finish Strategy
- Match trim: Same white/color as other trim (most common)
- Match walls: Creates seamless look, makes room feel larger
- Match floors: Stained to match hardwood (high-end look)
- Contrast color: Bold design statement
- Two-tone: Baseboard different from wall and other trim
5. Budget Constraints
- MDF most economical for painted applications
- Pine mid-range, balances cost and quality
- Hardwoods premium price for stain-grade applications
Current Design Trends:
- Taller baseboards: Movement toward 5-7″ even in standard homes
- Simpler profiles: Clean lines over ornate details
- Matte finishes: Over high-gloss for contemporary look
- No base shoe: Integrated profiles or careful flush installation
- Contrast colors: Dark baseboards with light walls gaining popularity
Cost Considerations and Budgeting
Material Cost Ranges (Per Linear Foot):
- MDF: $0.50 – $1.50
- Pine: $1.00 – $3.00
- Finger-jointed pine: $0.75 – $2.00
- Oak/Hardwood: $2.50 – $8.00+
- PVC: $1.50 – $4.00
- Custom millwork: $5.00 – $20.00+
Installation Costs:
- DIY: Material cost only + tool investment
- Professional installation: $3 – $8 per linear foot (including materials)
- Typical room (12×12): $300 – $800 professionally installed
Cost-Saving Tips:
- Use MDF for painted applications
- Install standard profiles rather than custom
- Paint before installation to reduce labor
- Consider stock sizes rather than custom milling
- DIY installation if skilled
Conclusion
Baseboard moulding represents the essential intersection of form and function in interior design.
What begins as a practical solution for covering gaps and protecting walls evolves into a defining architectural element that establishes a room’s style, proportion, and character.
From the ornate baseboards of Victorian parlors to the minimalist absence in some contemporary spaces, the treatment of the wall-floor junction speaks volumes about architectural priorities and aesthetic values.
Today’s homeowners and designers have unprecedented options, from traditional wood profiles to innovative synthetic materials that offer durability and moisture resistance.
Whether undertaking a full renovation or simply updating tired trim, thoughtful baseboard selection and installation can dramatically elevate a space.
It’s the finishing touch that makes walls feel intentional, rooms feel complete, and architecture feel resolved—the quiet foundation upon which beautiful interiors are built.