How To Make Airplane Molds is essential for creating lightweight, complex aerodynamic shapes used in everything from hobbyist RC planes to full-scale aircraft components, UAVs, and architectural models.
Foam airplane mold manufacturing represents a specialized subset of aerospace tooling that combines accessibility with precision.
Unlike solid metallic molds, foam molds offer unique advantages in weight, thermal insulation, and machinability, making them ideal for prototyping, limited production runs, and specific composite manufacturing processes.
Understanding Foam as a Mold Material

Why Choose Foam for Aircraft Molds?
Foam molds offer distinct advantages for specific aerospace applications:
Weight Advantages:
- Extremely low density (typically 10-100x lighter than equivalent metal tools)
- Easy handling and repositioning without heavy equipment
- Reduced shipping and transportation costs
- Lower foundation/bench requirements in workshops
Thermal Properties:
- Excellent insulation reduces heat transfer during curing
- Lower thermal mass allows for faster temperature ramps
- Reduced energy consumption for heated applications
- Minimized thermal expansion issues
Machinability and Fabrication:
- Easy to cut and shape with basic workshop tools
- Rapid prototyping capabilities with minimal equipment
- Ability to create complex contours without expensive 5-axis CNC
- Simple repair and modification of existing tools
Cost Effectiveness:
- Low material costs compared to metals or high-grade composites
- Reduced machining time and tool wear
- Minimal infrastructure investment
- Suitable for one-off or low-volume production
Limitations and Considerations
Durability Constraints:
- Limited number of production cycles (typically 5-50 depending on foam type and process)
- Surface damage susceptibility during demolding
- Compressive creep under prolonged pressure or vacuum
- Temperature limitations for most foam types
Surface Quality Challenges:
- Requires surface sealing/coating for acceptable finish
- Porosity can cause vacuum leaks in bagging processes
- Fine detail reproduction less precise than metal or composite molds
- May require secondary operations for high-gloss surfaces
Process-Specific Limitations:
- Not suitable for high-pressure molding processes
- Autoclave use restricted by temperature and pressure limits
- Chemical compatibility issues with certain resins and release agents
- Dimensional stability concerns over multiple thermal cycles
Foam Material Selection Guide
Rigid Polyurethane (PU) Foams
High-Density PU Foams (300-800 kg/m³):
- Applications: Master patterns, high-wear mold areas
- Advantages: Excellent machinability, good surface finish, moderate strength
- Brands/Formulations: RenShape, Renshape, Tancast, specialty tooling boards
- Processing: Easily CNC machined, hand-carved, sanded smooth
Low-Density PU Foams (40-200 kg/m³):
- Applications: Mold cores, lightweight tooling, one-off prototypes
- Advantages: Very lightweight, inexpensive, good insulation
- Limitations: Fragile surface, requires reinforcement
- Processing: Hot-wire cutting, band sawing, hand shaping
Polystyrene (EPS/XPS) Foams
Expanded Polystyrene (EPS):
- Density Range: 15-40 kg/m³ (bead foam)
- Applications: Lost foam patterns, disposable tooling, large-form molds
- Advantages: Extremely lightweight, inexpensive, readily available
- Processing: Hot-wire cutting, CNC routing with specialized tools, steam shaping
- Limitations: Poor surface quality, not suitable for direct molding surfaces
Extruded Polystyrene (XPS):
- Density Range: 25-45 kg/m³
- Applications: Insulation board for composite tooling, pattern making
- Advantages: Fine uniform cell structure, better surface than EPS
- Processing: CNC routing, hot-wire cutting, bandsaw cutting
- Chemical Compatibility: Avoid styrene-based resins (dissolves XPS)
Polyisocyanurate (PIR) Foams
Structural Insulated Panels (SIPs):
- Density Range: 30-200 kg/m³
- Applications: Large mold structures, composite sandwich cores
- Advantages: Fire resistance, better temperature tolerance than PU
- Processing: Similar to PU but with better thermal stability
- Chemical Resistance: Better than PU for most resins
Specialty Tooling Foams
Machinable Wax-Filled Foams:
- Composition: Polyurethane foam impregnated with wax
- Applications: High-precision patterns, fine detail reproduction
- Advantages: Excellent surface finish, minimal dust during machining
- Processing: Standard woodworking tools, produces wax-like chips
Composite-Reinforced Foams:
- Composition: Foam with fiber reinforcement (glass, carbon)
- Applications: Structural mold backings, high-strength cores
- Advantages: Improved strength and stiffness, reduced creep
- Processing: May require diamond-coated tools for machining
Temperature-Resistant Foams:
- Materials: Polyimide (PMI) foams, syntactic foams
- Applications: Elevated temperature tooling (up to 200°C+)
- Advantages: Exceptional thermal stability, low outgassing
- Processing: Expensive, requires careful machining
- Brands: Rohacell, Airex, Corecell
Material Selection Decision Matrix
| Application | Recommended Foam | Density Range | Key Considerations |
|---|---|---|---|
| Master Pattern | High-density PU | 400-600 kg/m³ | Surface finish, dimensional stability |
| Large Mold Core | Low-density PU | 80-150 kg/m³ | Weight, cost, insulation |
| High-Temp Tooling | PMI (Rohacell) | 50-200 kg/m³ | Temperature resistance, cost |
| Lost Foam Pattern | EPS | 20-30 kg/m³ | Disposability, complex geometries |
| Budget Prototype | XPS Insulation | 30-40 kg/m³ | Availability, ease of cutting |
| Precision Tooling | Wax-filled PU | 500-700 kg/m³ | Surface quality, machining precision |
| Structural Backing | Composite-reinforced | Varies | Strength requirements, bonding |
Manufacturing Processes and Techniques
Traditional Machining Methods
CNC Routing and Milling:
Equipment Requirements:
- Router/Spindle Power: 3-10+ HP depending on foam density
- Feed Rates: Typically 300-1000+ inches/minute
- Tooling: Compression bits, straight flute cutters, ball end mills
- Dust Collection: Critical for foam machining (explosive hazard with fine dust)
Best Practices:
- Use climb cutting for best surface finish
- Multiple step-down passes for deep cuts
- Adjust speeds/feeds based on foam density
- Consider sacrificial backing to prevent tear-out
- Use air blast to clear chips during cutting
Hot-Wire Cutting:
Applications: Airfoil sections, tapered shapes, simple contours
Equipment: Variable power supply, nickel-chromium or stainless steel wire
Techniques:
- 2D profiles from templates
- 4-axis cutting for twisted shapes
- Temperature control for clean cuts
- Multiple passes for thick materials
Advantages: Very smooth surface, minimal dust, fast cutting
Limitations: Limited to shapes that can be “swept” by straight wire
Hand Shaping and Carving:
Tools Required: Surforms, cheese graters, rasps, sanding blocks
Techniques:
- Template-guided shaping
- Progressive sanding through grits (80 → 120 → 220 → 400)
- Reference measuring with contour gauges
- Symmetry maintenance with measuring fixtures
Surface Preparation: Fill porosity with specialized fillers before final sanding
Advanced Fabrication Methods
3D Printing with Foam-Compatible Materials:
FDM/FFF Printing:
- Large-format printers for mold patterns
- Dissoluble support materials for complex geometries
- Layer heights 0.2-0.8mm depending on surface requirements
- Post-processing with sanding and filling
Bindered Sand/Powder Printing:
- Creates sand-like foam patterns for casting
- Suitable for lost foam casting processes
- Can incorporate internal voids and channels
Foam Lamination and Layup:
Stack Lamination:
- Gluing multiple sheets to create thick blanks
- Aligning grain/orientation for consistent properties
- Vacuum bagging during glue-up for uniform pressure
- Alternating adhesive types for machining vs. non-machining zones
Composite Skin Application:
- Applying fiberglass/carbon skins to foam cores
- Creating durable molding surfaces
- Balancing thermal expansion with surface materials
Foam Casting and Pouring:
Two-Part Pour Foams:
- Creating custom shapes in simple molds
- Controlling density through mixing ratios
- Embedding reinforcement or inserts
- Post-cure machining to final dimensions
Lost Foam Pattern Creation:
- Creating EPS patterns for metal casting
- Assembling complex shapes from multiple pieces
- Coating with refractory material for casting
Surface Treatment and Sealing
Sealing Imperative: All foams require surface sealing for use as molds
Epoxy-Based Sealers:
- Multiple thin coats preferred over single thick coats
- Sanding between coats for smooth surface
- Adding fillers (microballoons, colloidal silica) for viscosity control
- Temperature and humidity control during application
Polyurethane Sealers:
- Faster curing than epoxy
- Better flexibility on flexible foams
- Potential compatibility issues with some foam types
Specialized Tooling Coaters:
- High-build primer-surfacers
- Filled coatings for filling minor imperfections
- High-temperature coatings for elevated cure cycles
- Chemical-resistant formulations for specific resins
Surface Finishing Techniques:
- Block sanding with progressively finer grits
- Polishing to high gloss with automotive-type compounds
- Applying mold release directly to sealed surface
- Final inspection with reflective surface techniques
Mold Design Considerations for Foam Tools

Structural Design Principles
Support and Reinforcement:
Backing Structure Integration:
- Wood or aluminum framing for large molds
- Truss or rib designs for optimal stiffness-to-weight
- Attachment points for handling and mounting
- Alignment features for multi-part molds
Reinforcement Strategies:
- Fiberglass skin lamination for surface durability
- Carbon fiber reinforcement for high-temperature applications
- Metal inserts at high-wear or high-stress areas
- Edge protection with metal or hard plastic
Modular Design Approaches:
Segmentation Strategy:
- Dividing large molds into manageable sections
- Alignment and joining system design
- Vacuum integrity maintenance across joints
- Thermal expansion accommodation at joints
Insert Systems:
- Replaceable sections for high-wear areas
- Interchangeable features for different configurations
- Easy repair through localized replacement
Thermal Management Design
Low Thermal Mass Considerations:
Advantages:
- Rapid temperature changes possible
- Lower energy requirements for heating
- Reduced thermal lag in control systems
Challenges:
- Poor temperature uniformity without proper design
- Susceptibility to localized overheating
- Heat sink effects from metal reinforcements
Heating System Integration:
Electric Heating Elements:
- Silicone heating blankets on mold surface
- Cartridge heaters in drilled channels
- Resistive heating wires embedded near surface
- Temperature zoning for uniform heating
Fluid Heating Systems:
- Tube routing through or behind foam
- Ensuring even flow distribution
- Avoiding leaks in foam structures
- Temperature control system design
Insulation Strategies:
- Additional insulation behind heating elements
- Edge insulation to reduce heat loss
- Thermal breaks between mold and support structure
Process-Specific Design Features
Vacuum Bagging Molds:
Vacuum Integrity:
- Designing monolithic sections where possible
- Incorporating vacuum channels and ports
- Sealant groove design at mold perimeters
- Leak testing provisions during fabrication
Breather and Bleeder Access:
- Accommodating vacuum bagging materials
- Ensuring even vacuum distribution
- Providing attachment points for bag sealant
Compression Molds:
Pressure Distribution:
- Reinforcing high-pressure areas
- Ensuring parallel closure of mold halves
- Incorporating guide pins and bushings
- Calculating deflection under operating pressure
Release Mechanisms:
- Draft angles for part removal
- Air ejection channels and ports
- Mechanical ejection system integration
- Non-stick surface treatments
Step-by-Step Fabrication Process
Phase 1: Planning and Preparation
1.1 Design Translation:
- Convert 3D CAD to machining instructions
- Determine segmentation and assembly strategy
- Plan material usage and minimize waste
- Design fixtures and holding methods
1.2 Material Procurement:
- Order foam with appropriate lead time for acclimation
- Source all ancillary materials (adhesives, sealers, reinforcements)
- Prepare workshop with adequate ventilation and dust collection
- Calibrate all measuring and machining equipment
1.3 Workspace Preparation:
- Dedicated clean area for final assembly
- Temperature and humidity control if possible
- Adequate lighting for detail work
- Organized workflow from rough to finish operations
Phase 2: Rough Shaping
2.1 Blank Preparation:
- Cut foam blocks to approximate size (+25mm oversize)
- Laminate if required for thickness
- Allow adhesive cure time before machining
- Establish primary datums on blank
2.2 Initial Machining:
- Remove bulk material leaving 3-5mm excess
- Establish critical surfaces and alignment features
- Machine any internal cores or cavities
- Verify dimensions against CAD model
2.3 Stress Relief:
- Allow foam to stabilize after machining
- Address any warping or distortion
- Perform intermediate measurements
- Make minor adjustments before final machining
Phase 3: Precision Machining
3.1 Semi-Finishing:
- Machine to within 0.5-1.0mm of final dimensions
- Establish all critical features and locating points
- Create any vacuum channels or utility paths
- Verify with intermediate inspection
3.2 Final Contouring:
- Light finishing passes for final dimensions
- Achieving required surface finish
- Machining draft angles and release features
- Final dimensional verification
3.3 Detail Work:
- Hand finishing of complex areas
- Adding textures or special features
- Installing inserts or reinforcement
- Preparing for surface treatment
Phase 4: Surface Treatment
4.1 Cleaning and Preparation:
- Complete dust removal (compressed air, vacuum)
- Degreasing if necessary
- Minor defect repair with compatible fillers
- Surface activation for coating adhesion
4.2 Sealing Application:
- Multiple thin coats (typically 3-6 coats)
- Sanding between coats (220-400 grit)
- Building sufficient thickness for durability
- Ensuring complete coverage of all surfaces
4.3 Final Finishing:
- Final sanding to required smoothness
- Polishing if high gloss required
- Application of permanent mold release
- Final inspection under good lighting
Phase 5: Assembly and Validation
5.1 Multi-Part Assembly:
- Alignment of mold halves/sections
- Ensuring proper fit and clearances
- Securing with appropriate fastening
- Sealing joints for vacuum integrity
5.2 Functional Testing:
- Vacuum testing if applicable
- Trial fitting with sample materials
- Checking release characteristics
- Verifying heating systems if installed
5.3 Documentation:
- Recording as-built dimensions
- Creating setup and operation instructions
- Maintenance schedule and procedures
- Storage and handling guidelines
Process-Specific Applications
Composite Layup Molds
Open Molding Applications:
- Wet layup: Directly on foam mold surface
- Prepreg layup: Requires sealed, smooth surface
- Infusion molds: Must withstand full vacuum, include flow channels
Key Design Features:
- Vacuum integrity through entire structure
- Temperature capability matching resin system
- Surface finish matching part requirements
- Demolding considerations for complex shapes
Thermoforming Molds
Sheet Thermoforming:
- Materials: ABS, acrylic, polycarbonate sheets
- Mold Requirements: Good insulation, vacuum channels, cooling provisions
- Surface Finish: Determines part appearance side
Composite Thermoforming:
- Prepreg forming: Heated molds, pressure application
- Thermoplastic composites: Higher temperature requirements
- Cycle Time: Influenced by mold thermal mass
Lost Foam Casting Patterns
Pattern Creation:
- Machining EPS foam to precise shapes
- Assembling multi-piece patterns
- Applying refractory coating
- Gating and riser system design
Casting Process:
- Pattern placement in flask
- Sand compaction around pattern
- Molten metal vaporizes foam
- Metal takes pattern shape exactly
Advantages for Aircraft:
- Complex internal passages possible
- Excellent dimensional accuracy
- Minimal draft angles required
- Reduced machining of final part
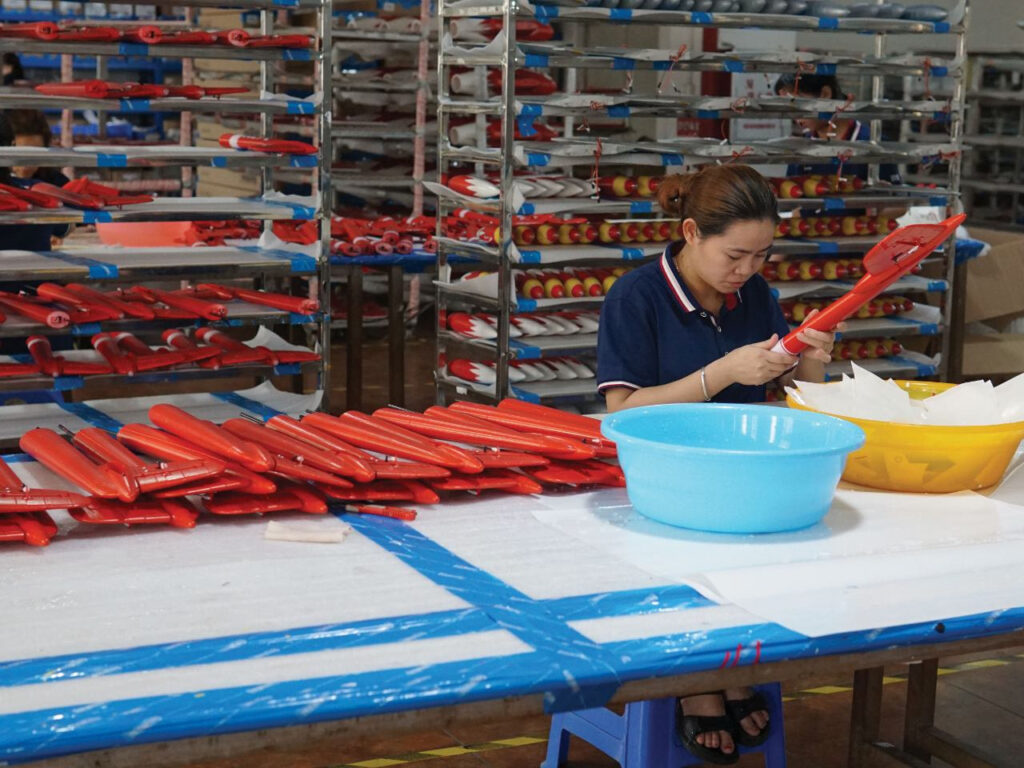
Architectural and Display Models
Scale Model Production:
- Creating accurate aircraft models
- Surface detail reproduction
- Lightweight for handling and display
- Cost-effective for limited runs
Exhibition and Museum Displays:
- Large-scale sectional models
- Interactive cutaway displays
- Lightweight for ceiling mounting
- Durability for public handling
Advanced Techniques and Innovations
Hybrid Mold Construction
Foam Core with Composite Skin:
- Structure: High-quality surface skin over foam core
- Benefits: Combines surface quality of composites with lightweight core
- Applications: Production tools for limited runs
Metal-Faced Foam Tools:
- Thin metal face sheet on foam substrate
- Benefits: Excellent surface finish, good heat transfer
- Fabrication: Adhesive bonding or mechanical fastening
Reinforced Foam Structures:
- Internal reinforcement with fibers or fabrics
- Benefits: Improved strength and stiffness
- Processing: Co-molding or post-application
Digital Fabrication Integration
3D Scanning for Reverse Engineering:
- Capturing existing part geometry
- Creating CAD models from physical objects
- Modifying designs in digital space
- Outputting to CNC for foam machining
Additive Manufacturing Hybrids:
- 3D printed details on foam substrates
- Complex features added digitally
- Conformal cooling channels incorporated
- Custom inserts for specific features
Robotic Fabrication:
- Large-scale foam machining with industrial robots
- Continuous path milling for complex surfaces
- Automated surface finishing
- Quality inspection integrated into process
Sustainable and Recyclable Approaches
Bio-Based Foams:
- Plant-derived polyurethanes
- Recycled content foams
- Biodegradable options for disposable patterns
Recycling and Reuse:
- Grinding and rebonding spent foam tools
- Material recovery from composite-faced tools
- Closed-loop systems for manufacturing waste
Energy-Efficient Processes:
- Low-temperature curing compatible with foam
- Room-temperature resins for foam tooling
- Insulated molds reducing energy consumption
Conclusion
Foam aircraft mold manufacturing occupies a unique position in aerospace tooling—bridging the gap between rapid prototyping and limited production, between hobbyist accessibility and industrial precision.
As materials and methods continue to evolve, foam molds are becoming increasingly capable while maintaining their fundamental advantages of light weight, thermal efficiency, and cost effectiveness.
The future of foam mold technology lies in hybridization—combining the best attributes of foam with other materials, integrating digital technologies throughout the workflow, and developing increasingly sophisticated formulations that push the boundaries of what’s possible with cellular materials.
Whether for creating a one-off prototype of a new UAV design, producing limited-run components for experimental aircraft, or fabricating large display models for aerospace exhibitions, foam molds offer a versatile, accessible, and effective solution that continues to find new applications in the ever-evolving world of aerospace manufacturing.